<TODO: Recover page>
Iron Man 3 Chest Arc Reactor
I made this prop to wear to the Iron Man 3 release (and to test out some new technology for a future project).
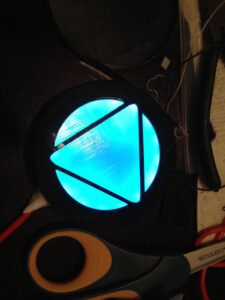
The whole thing was designed in OpenSCAD and 3D printed in ABS (both the housing and the diffusor puck). A Teensy 2 module drives the LED strip (WS2812 clone, 60 pixels/m) and is is wired up to a BLE112 module for communications.
You can control it via Bluetooth (no app yet, you hand craft a 1, 3, 6, or 7 byte message in a BLE explorer app to set a greyscale color, or one/two RGB colors and a ping-pong speed). By default it boots up into ‘Arc reactor blue’ with a soft breathing animation.


Undead Man Lover
Undead Man Lover is the game I worked on for the 2013 Global Game Jam at the NC State location.
The jam started off rough due to a nasty winter storm, which prevented us from meeting on Friday night. We did pitches/team formation thru a combination of mumble, google+, and a wiki. Thankfully the roads cleared up enough to open the jam site on Saturday around 1 pm and we were able to jam in person for the rest of the weekend.
How to Play
- As one of the last humans alive, you need to love you some zombies to save the human race.
- Revive zombies and help the un-undead escape thru the portal.
- Zombies love beating hearts, distract them with yours.
- Spells and running take a toll on your heart.
Controls
This game can be played with a keyboard or a gamepad.
Keyboard controls:
- Arrow keys – Movement.
- Z – Revive the nearest zombie.
- X – Repulse nearby zombies.
- C – Meditate to calm your heart.
Gamepad controls:
- [Left Stick] – Movement.
- [A] – Revive the nearest zombie.
- [B] – Repulse nearby zombies.
- [X] – Meditate to calm your heart.
Download
Download either the full package or just the game.
You need the XNA4 redistributable package to play the game:
http://www.microsoft.com/download/en/details.aspx?id=20914
Concept
The theme was [sound of a beating heart], and we had initially been stuck in a rut creating ideas that were just ‘it’s like X but’… ‘ you manage heartrate’ / ‘in a heart’ / ‘to the beat’. After a few of these, Nick and I threw some heart-related words into the venerable madlib generator and went thru the list.
“Undead Man Lover” was one that immediately clicked, although some of the off-theme ones looked good too (maybe for a future jam…). Our final game ended up surprisingly close to the initial pitch, with only a shift from a post-apocalyptic cityscape to a fantasy setting due to art availability.
Credits
Jammers:
- Michael Noland
- Nick Darnell
- Kenny Huang
- Jonathon Powell
Additional content used under license from:
- Antifarea, Artisticdude, CharlesGabriel, Eleazzaar, and Hyptosis (OpenGameArt.org)
- Kevin MacLeod (incompetech.com)
Exploding Slime Painter
This past weekend was the 2012 Triangle Game Jam. Our theme was game titles generated by madlibs: everyone contributed a list of 5 adjectives, 5 nouns, and 5 verb stems, and a program generated random game names from them. From there, we pitched ideas based on the titles and formed teams.
There were a lot of good titles, but the one I pitched and ended up making into a game is Exploding Slime Painter. The team consisted of Mike Daly, Michael Noland, and Frank Voelker, with some sounds from Ash Gowland.
Downloads
- Exploding Slime Painter
- XNA 4 redistributable package (needed to play the game)
- Source code and artwork
How to Play
It’s a score-attack game for one or two players trying to paint objectives in their team color, but take time to watch in delight as slimes wobble around and explode.
- Explode slimes to earn points and unleash their colorful painting goo
- Paint and hold objectives in your color for a big ongoing score
- Kicked slimes will explode on impact, giving you bonus points
Controls
Best played with an Xbox 360 controller, but can be played on the keyboard as well.
Player 1 (Red):
- Use the arrow keys or the left thubmstick to move around
- Press [RightCtrl] or gamepad [A] to kick slimes in front of you
- Hold the kick button down to charge the kick, sending them father
- Hold [RightShift] or gamepad [B] to summon red slimes to your side
Player 2 (Blue):
- Use the arrow keys or the left thubmstick to move around
- Press [Space] or gamepad [A] to kick slimes in front of you
- Hold the kick button down to charge the kick, sending them father
- Hold [LeftShift] or gamepad [B] to summon blue slimes to your side
Notes
- Additional content was used under license from artisticdude, Daniel Cook, Charles Gabriel, and Kevin MacLeod (for more information, see the LICENSE.txt file).
- The game should be called ‘Explosive Slime Painter’ under the madlib construction rules, but we ran with the title right out of the madlib generator as it didn’t make a difference: the slimes are explosive and they end up exploding.
Multi-turret water cannon
I’ve been holding off on posting about this until I got some time to finish it up, but now seems like a good time since it was mentioned in a community blog post.

I didn’t capture a proper video of it in action, but there are a couple snippets in this awesome picnic compilation video put together by Aaron:
The cannon uses a pre-pressurized water bladder, typically used to smooth out variations in water pressure for houses or RVs. The pressure of the output water will be roughly the same as the water supply used to charge the tank (and it can also be run in ‘continuous’ mode by leaving the hose connected). At the picnic site, the park water supply pressure was crazy high, which resulted in very nice performance. However, I saw about 90 psi on the pressure gauge at one point, which is uncomfortably close to the tank safety rating.
The drive electronics are just an Arduino that sequences four relays in turn controlling the sprinkler valve solenoids.
Planes on a Snake
This past weekend was the 4th annual Global Game Jam, and we hosted a site in the triangle again. I was an organizer this year, but I still had plenty of time to jam, creating Planes on a Snake with my team. The theme was a picture of an ouroboros, which we interpreted by setting a shmup on the back of the world serpent.
Brief Play Description
A rift in spacetime has resulted in a large number of World War II era planes getting stuck on the world snake.
Join the frequent fliers club of Ouroboros Airlines, racking up points while taking advantage of the torus nature of your new environment.
(video contains some strong language)
You have three weapons at your disposal:
- Single shot – the default weapon
- Spread shot – Three times the fun
- The Lazër – A beam weapon that goes to 11
You progress thru the weapons as you collect powerups dropped by fallen enemies.
Once the meter is at least half full, you can activate the lazër, which fires until your reserves are depleted.
Scoring
- Bullets will fly around and around forever, so watch out for crossfire from your own shots.
- Earn more points by hitting adversaries with shots that have been flying for a long time.
- Death is transient on the world snake, both you and your adversaries will eventually respawn.
- Make as many points as you can during the time limit to earn your place in the frequent fliers club.
Jammers
- Stephen Hodgson
- Scott Jacobs
- Luv Kohli
- Michael Noland
- Chris VanderKnyff
Additional graphics by
- David Gervais
Original GGJ page.
Download
Download the game or source code.
Screenshots:


Speeding up LPD8806 show() without hardware SPI
If you’re using LPD8806 LED strips and you can’t use the hardware SPI port (e.g., when using an Ethernet board), there are two other options in the Adafruit library: the default mode and ‘slowmo’ mode. The default mode is decent, but the flexibility of being able to choose the pins at runtime comes with a cost.
However, you can still get a decent speedup by defining your pin usage at compile time in a replacement show() function. I measured the time required to update an 86 LED strip using each method on an EtherTen board (Atmega328 @ 16 MHz, same as the Uno):
30.23 ms - Adafruit 'slowmo' method (digitalWrite)
7.76 ms - Adafruit default method (port pointers)
1.54 ms - Compile-time method
1.43 ms - Adafruit hardware SPI method
The timing was done using micros() around the show() call with strip.pause = 0.
I’ve tried to make this method as minimally hardcoded as possible. To use, throw the code from CompileTimeLEDs.h into the LPD8806 class in LPD8806.h and replace:
int ClockPin = 3;
int DataPin = 2;
...
strip.show();
with:
const int ClockPin = 3;
const int DataPin = 2;
...
strip.showCompileTime<ClockPin, DataPin>();
This overload is only available on ATmega168 or ATmega328 boards; on the Arduino Mega or other random boards, you need to specify the port register and use pin offsets within the port instead of the Arduino board pin number (e.g., showCompileTime<0..7, 0..7>(PORTD, PORTD))
CompileTimeLEDs.h (Download)
template<unsigned int ClockPin>
void PulseClockLine(volatile uint8_t& ClockRegister)
{
  const byte LED_CLOCK_MASK = 1 << ClockPin;
  ClockRegister |= LED_CLOCK_MASK;
  ClockRegister &= ~LED_CLOCK_MASK;
}

template<unsigned int ClockPin, unsigned int DataPin>
void TransmitBit(byte& CurrentByte, volatile uint8_t& ClockRegister, volatile uint8_t& DataRegister)
{
  // Set the data bit
  const byte LED_DATA_MASK = 1 << DataPin;
  if (CurrentByte & 0x80)
  {
    DataRegister |= LED_DATA_MASK;
  }
  else
  {
    DataRegister &= ~LED_DATA_MASK;
  }

  // Pulse the clock line
  PulseClockLine<ClockPin>(ClockRegister);

  // Advance to the next bit to transmit
  CurrentByte = CurrentByte << 1;
}

#if defined(__AVR_ATmega328P__) || defined(__AVR_ATmega168__)
  #define MAP_ARDUINO_PIN_TO_PORT_PIN(ArduinoPin) \
    ( ArduinoPin & 7 )

  #define MAP_ARDUINO_PIN_TO_PORT_REG(ArduinoPin) \
    ( (ArduinoPin >= 16) ? PORTC : (((ArduinoPin) >= 8) ? PORTB : PORTD) )

  // Specify Arduino pin numbers
  template<unsigned int ClockPin, unsigned int DataPin>
  void showCompileTime()
  {
    showCompileTime<MAP_ARDUINO_PIN_TO_PORT_PIN(ClockPin), MAP_ARDUINO_PIN_TO_PORT_PIN(DataPin)>(
      MAP_ARDUINO_PIN_TO_PORT_REG(ClockPin),
      MAP_ARDUINO_PIN_TO_PORT_REG(DataPin));
  }

  #undef MAP_ARDUINO_PIN_TO_PORT_PIN
  #undef MAP_ARDUINO_PIN_TO_PORT_REG
#else
  // Sorry: Didn't write an equivalent for other boards; use the other
  // overload and explicitly specify ports and offsets within those ports
#endif

// Note: Pin template params need to be relative to their port (0..7), not Arduino pinout numbers
template<unsigned int ClockPin, unsigned int DataPin>
void showCompileTime(volatile uint8_t& ClockRegister, volatile uint8_t& DataRegister)
{
  // Clock out the color for each LED
  byte* DataPtr = pixels;
  byte* EndDataPtr = pixels + (numLEDs * 3);

  do
  {
    byte CurrentByte = *DataPtr++;

    TransmitBit<ClockPin, DataPin>(CurrentByte, ClockRegister, DataRegister);
    TransmitBit<ClockPin, DataPin>(CurrentByte, ClockRegister, DataRegister);
    TransmitBit<ClockPin, DataPin>(CurrentByte, ClockRegister, DataRegister);
    TransmitBit<ClockPin, DataPin>(CurrentByte, ClockRegister, DataRegister);

    TransmitBit<ClockPin, DataPin>(CurrentByte, ClockRegister, DataRegister);
    TransmitBit<ClockPin, DataPin>(CurrentByte, ClockRegister, DataRegister);
    TransmitBit<ClockPin, DataPin>(CurrentByte, ClockRegister, DataRegister);
    TransmitBit<ClockPin, DataPin>(CurrentByte, ClockRegister, DataRegister);
  }
  while (DataPtr != EndDataPtr);

  // Clear the data line while we clock out the latching pattern
  const byte LED_DATA_MASK = 1 << DataPin;
  DataRegister &= ~LED_DATA_MASK;

  // All of the original data had the high bit set in each byte.  To latch
  // the color in, we need to clock out another LED worth of 0's for every
  // 64 LEDs in the strip apparently.
  byte RemainingLatchBytes = ((numLEDs + 63) / 64) * 3;
  do
  {
    PulseClockLine<ClockPin>(ClockRegister);
    PulseClockLine<ClockPin>(ClockRegister);
    PulseClockLine<ClockPin>(ClockRegister);
    PulseClockLine<ClockPin>(ClockRegister);

    PulseClockLine<ClockPin>(ClockRegister);
    PulseClockLine<ClockPin>(ClockRegister);
    PulseClockLine<ClockPin>(ClockRegister);
    PulseClockLine<ClockPin>(ClockRegister);
  } while (--RemainingLatchBytes);

  // Need a bit of a delay before clocking again, but ideally this
  // is set to 0 and meaningful work is done instead
  if (pause)
  {
    delay(pause);
  }
}
License: CC0 (Placed into the public domain).
The avr-gcc compiler seems to do fine at recognizing the compile time constants and doing the right thing in codegen, as this method is just as fast as my original macrotastic implementation. You can probably eke out some more performance (would be nice to beat the hardware SPI implementation ^_^), but this was enough to get the headroom I needed.
Reducing code size on Arduino Ethernet boards
The Ethernet library grew in size several KB from 0022 to 1.0, which is a big deal when you only have 32 KB to play with. You can save about 2 KB by compiling out DNS support:
Wrap the following pieces of code in #if WITH_DNS
- Dns.cpp and Dns.h:
The entire file - EthernetClient.h and EthernetClient.cpp:
int connect(const char* host, uint16_t port) - EthernetUDP.h and EthernetUDP.cpp:
int beginPacket(const char *host, uint16_t port) - Client.h:
virtual int connect(const char *host, uint16_t port) - Udp.h:
virtual int beginPacket(const char *host, uint16_t port)
Add #include "EthernetUDP.h" to EthernetUDP.cpp, since it’s currently relying on the indirect include from Dns.h.
Faster Arduino development
I’ve been using Arduino boards for a bunch of random projects lately. They may not be as inexpensive or as small as throwing together a microcontroller and a resonator on a piece of perf board, but they’re a lot faster when making one-offs: lots of shields with ready-to-go libraries, quick programming / test cycle, etc…
One major downside is that the official Arduino IDE has a super-awful text editor, but there is a solution. Visual Micro has a plugin called Arduino for Visual Studio that makes everything ‘just work’ in the VS IDE, even VAX. Install the Arduino 1.0 IDE, then install the plugin, and all you have to do is point the plugin to your Arduino directory the next time you run devenv. It handles the rest, setting up syntax highlighting for .ino/.pde files, adds a toolbar to pick the board type and COM port, etc… To top it all off, it compiles about 10 times faster than the official IDE (0.2 – 0.5 s versus 5-10s); so much faster that it seems like there is a bug in the current version of the Arduino IDE.
Long story short, if you are doing any Arduino development and have VS 2008 or VS 2010 (the express edition won’t work since it doesn’t have support for plugins), you should download it now for a massive productivity boost.
Return of the fooding
Weekly fooding has finally started back up.
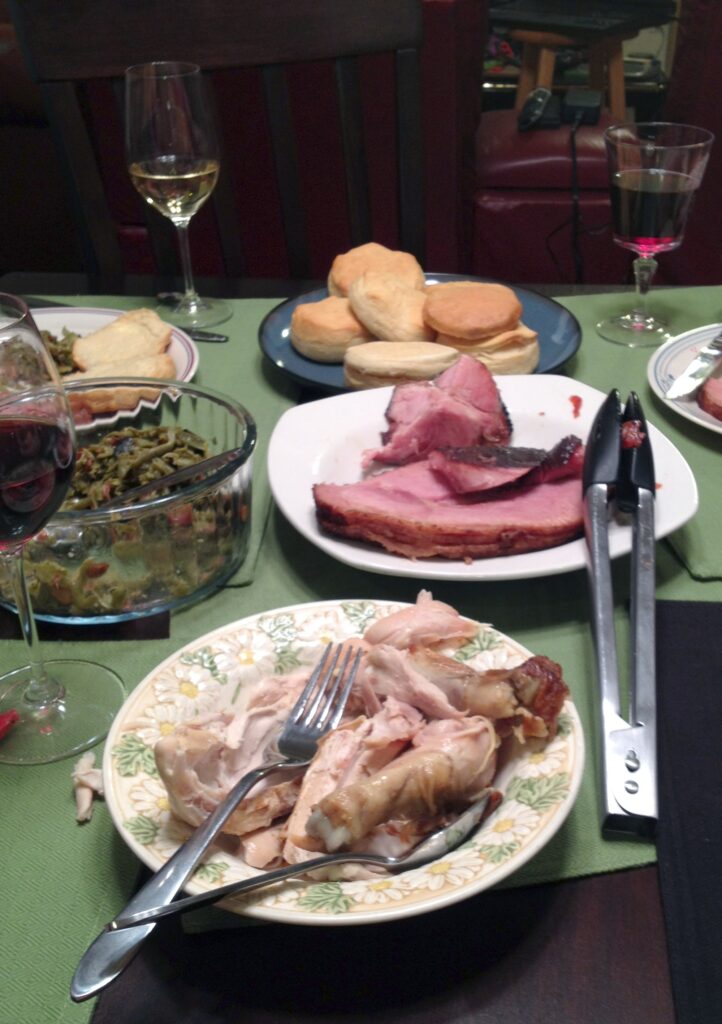
The evening had some new converts to green beans almondine, and the spiral baked ham turned out very nice. I followed a recipe from Emeril Lagasse, making a cherry-orange glaze, and cooking with Coca Cola in the pan to prevent the ham drying out.