Tappy Chicken is the first UE4 game shipped on mobile platforms. It’s a very accessible one-button game, and you can download the entire game source assets and blueprints from the UE4 marketplace for free.
The shipped version targets the following platforms:
iOS: iPhone 4 / iPad 2 or above, running iOS 6 or above.
Android: Devices with an OpenGL ES 2.0 GPU that run API level 9 (Android 2.3) or above.
HTML5: Browsers that support WebGL (Latest Firefox, Chrome, Safari, or Opera)
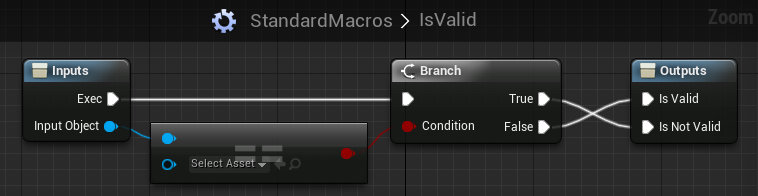
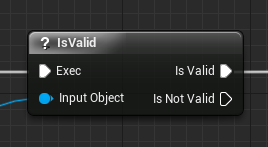
A Blueprint Macro lets you reuse a set of nodes over and over, and can be created in any blueprint (using the Add Macro button on the ‘My Blueprint’ toolbar). You can also turn a selection into a macro by right-clicking on a selected node and using the ‘Collapse to Macro’ option. A macro works a lot like a collapsed graph; you can define arbitrary inputs and outputs, which will show up as pins whenever you place a macro instance. Here is an example of a macro named IsValid, which checks to see if an object pin is valid or not:
IsValid macro declaration
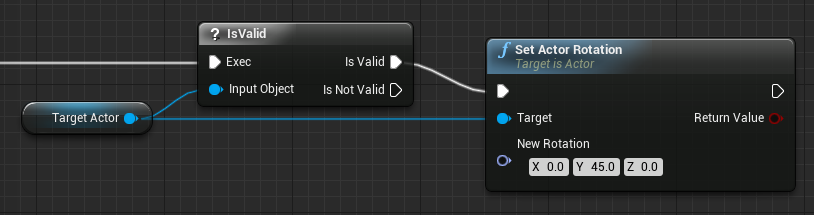
This macro can then be placed as an instance in another graph as ‘shorthand’ for the nodes it contains, allowing you to reuse code and hide complexity:
IsValid macro usage
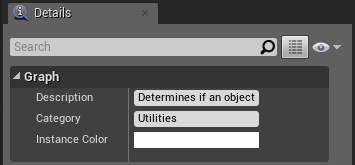
Be sure to set the Description and Category on your macros. The description will show up as part of the tooltip on node instances, helping you remember what the macro is doing without having to open it up (though you can always peer inside by double-clicking on an instance). The category defines where the macro shows up in the graph action menu. You can also pick an instance color, which controls the color of the node title bar on instances (for example, we use white to indicate flow control nodes, matching the color of execution pins and wires).
Specifying Description and Category
Macro Libraries
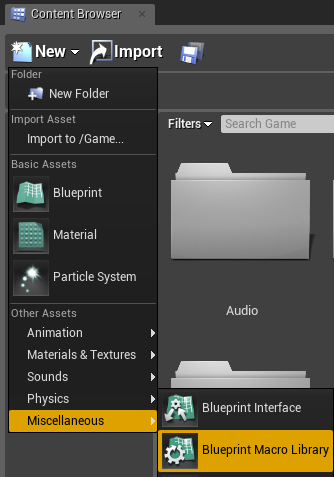
You can add macros to any blueprint, but normally they are only available for use in that Blueprint. In order to share a macro across many blueprints, you can add them to a Macro Library. There are a couple of built-in Macro Libraries in the Engine content directory (many features such as for loops are actually built using macros), but you should never edit content in the engine yourself, since future engine updates will stomp on your changes. Instead, create a Macro Library asset for your project using the content browser:
Creating a new Macro Library
You’ll be asked to pick a parent class for your macro library just like a regular blueprint (Actor is a safe choice if you’re not sure what this means). This allows macros in the library to access variables and functions declared in the parent class as if they were in scope. For example, macros in a library based on Pawn can call GetController without being passed a Pawn, and they will only show up as options in the context menu for Blueprints based on Pawn or a more derived class like Character.
There’s also a tutorial that will walk you thru the Macro Library editor interface the first time you make one (it can be accessed again from the Help menu if you’ve already skipped it).
As you build larger projects with Blueprints, it’s easy to end up with an overwhelming sea of nodes. However, we’ve built in a number of different encapsulation and code reuse mechanisms to help you battle the chaos.
To encapsulate something is “to show or express the main idea or quality of (something) in a brief way”; in other words we can hide a complex sequence of nodes with a simple stand-in that conveys the same meaning or idea. You can still drill down and see how it works ‘under the hood’, but you don’t have to worry about the details when looking at the broader picture.
Code reuse is frequently paired along with encapsulation, but basically it’s the approach of applying the same idea (set of nodes) in different situations without having to duplicate your work each time. It’s obviously more effort to duplicate the work each time, and any bugs or feature changes would have to be done in each copy independently.
Here’s a quick comparison of the benefits and limitations of the different approaches:
Functions
Events
Macros
Collapsed Graphs
Execution Paths
One
One
Any
Any
Non-exec Outputs
Any
None
Any
Any
Latent actions
No
Yes
Yes
Yes*
Add components/timelines
No
Yes
No
Yes*
Other events
No
N/A
No
Yes*
* A collapsed graph inherits the limits of the graph it is in, e.g., a collapsed graph inside of a function still cannot contain latent actions or timelines.
Collapsed Graphs
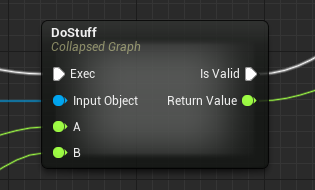
You can make a collapsed graph from a selection of nodes by right-clicking on one of the nodes and selecting ‘Collapse Nodes’. Any wires to nodes outside of the selection set will become inputs or outputs to the new collapsed node. Once collapsed, you can hover over the node to see a preview of the nodes in the contained graph.
Collapsed graph node
Collapsed graphs can contain any kind of node that is allowed in their current context and have no limits on their inputs/outputs. Collapsed graphs may seem like the best pick of the bunch with no limitations on the nodes they contain, but they are limited to only encapsulation, not code reuse. If you copy-paste a collapsed graph, all of the nodes inside get duplicated too, making a new collapsed graph rather than referencing the original.
Functions and Events
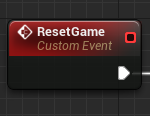
You can create your own empty functions using the Add Function button on the ‘My Blueprints’ toolbar or turn a selection of nodes (if it meets the limitations) into a function using the ‘Collapse to Function’ option when right-clicking on a selected node. You can make new events using the Add Custom Event… action in the graph context menu. A function shows up as a separate graph in the My Blueprints list, while events go into an event graph which can contain many different events.
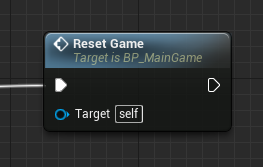
Functions and events can both be called from other places in the blueprint just like calling a function defined in C++. Both of them define a single path of execution from an outside caller’s perspective, although they can have branching or loops internally. Events can also have their execution flow delayed by a latent action or even merge into the flow for another event.
Functions are guaranteed to execute and return immediately by limiting what kinds of nodes can be placed in a function (latent actions, timelines, etc… are all prohibited). This allows them to return a value to a C++ caller, which isn’t possible when using events or macros.
Functions and events are also how C++ can call into Blueprints. C++ can define a function as a BlueprintImplementableEvent which can be implemented in a Blueprint. These functions have no built-in behavior, and will do nothing if called without a blueprint implementation, but they can instead be declared as a BlueprintNativeEvent, and provided with a C++ definition as well. Although these UFUNCTION() keywords mention just events, they will turn into either events or functions in a blueprint when implemented in a Blueprint, depending on whether they have any return values or not.
Macros
You can create a new empty Macro using the Add Macro option on the ‘My Blueprints’ toolbar, or turn a selection of nodes into a macro using the ‘Collapse to Macro’ option when right-clicking on a selected node. You can also create Blueprint Macro Libraries, sharing macros across many blueprints. This makes them one of the most effective means of Blueprint code reuse. I’ll go into more depth on macros and macro libraries in a future post.
Calling a Macro
Macros can have arbitrary inputs and outputs, including execution wires. Macros can be called in the same way as functions or events from a blueprint, but they aren’t visible from C++ code. Like collapsed graphs, macros don’t really exist in a compiled blueprint; every instance gets expanded out into a unique set of nodes during compilation.
Since you can have more than one instance of a macro, some things like custom events are prohibited inside of the macro, since there’d be ambiguity in which one (or in which order) to execute them. Timelines and Add Component nodes are currently also prohibited due to implementation details, but we’d like to allow them in the future.
Comments
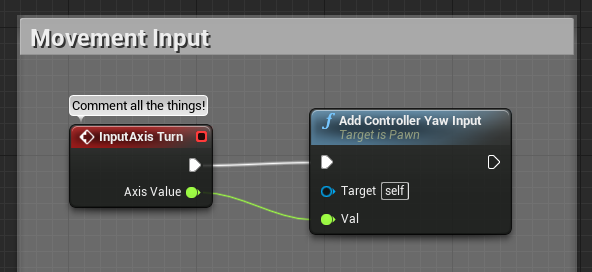
Comments are basically a present to future-you from current-you; explaining what your intentions were or making a note of potential issues and additional work to be done.
Comment boxes
You can place a comment box around selected nodes by pressing C. By default these boxes move all contained nodes around with them, but you can change that behavior as well as the color in the Details panel. You can edit the comment just like any other editable title by double-clicking on it or pressing F2. You can also comment any other individual nodes using the field in the context menu for that node, which will show up as a bubble above the node.
Finally, you can write a comment that will show up in the Content Browser tooltip for your Blueprint by ‘Blueprint Properties’ and editing the ‘Blueprint Description’ in the Details panel. This is really useful for gameplay Blueprints that don’t have a thumbnail preview, but it’s still good to add usage notes even for things like level props that have a thumbnail.