In this series of articles I’m going to show how to create some high-impact, low-effort tools to help develop your game in UE4. Tools range from simple batch files or humble debug commands to complex ensembles like the UE4 level editor or Max/Maya; but for now let’s focus on some approaches that don’t require a broad knowledge of Unreal Engine or Slate to pull off. Some of these topics deserve a post of their own, but I’m going to start with more of a survey approach and see what people are most interested in digging into.
Programming is all about strategic laziness: the guiding philosophy developing tools is to spend time now to save someone time later, improving overall developer efficiency. This might play out by allowing the user to finish the same tasks in less time or it might allow them to perform more iterations in the same amount of time, increasing polish level and fun factor. Ideally you also save more time than was involved in making the tool, but that is not a hard requirement due to other factors like user morale, making it possible for a different group of people to do the work, reducing mistakes when the cost of failure is high, etc… This is especially true when it comes to automating key processes where a mistake might cause downtime or otherwise hurt your customers, e.g., releasing a broken update or corrupting a database.
In the more typical cases where there’s a reasonable if slow or annoying alternative, estimating the !/$ (bang for the buck) is a pragmatic way to look at whether or not it’s worth making a tool: does this help more than it’s going to cost to create (given very rough estimates of both)? As always, there’s a relevant XKCD strip:
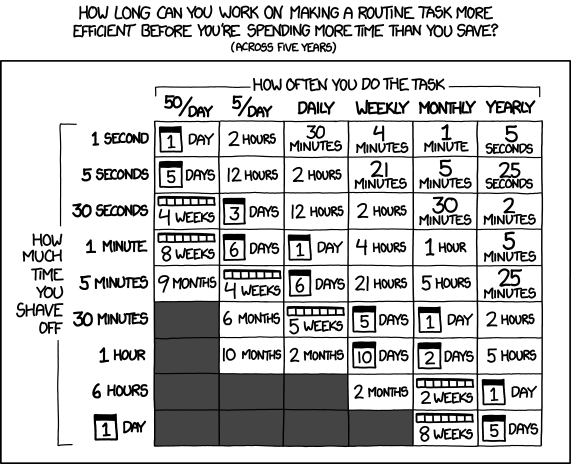
[don’t forget to multiply ‘how often’ by the number of developers impacted; tools that help 50 people on a team are much easier to justify than ones that help 2, much to the distress of audio developers everywhere]
- Part 1: Tools to help debug or iterate while the game is running
- Part 2: Tools for working with assets or actors in the editor [to be written]
- Part 3: Tools to automate repetitive tasks [to be written]
Part 1: Tools to help debug or iterate while the game is running
The debug console can be used to trigger commands and adjust console variables (CVars), and is available both in the editor and the game during development, though it is compiled out of the shipping game by default. It can be brought up by pressing the ` key (configurable in Project Settings), and commands can also be entered into the Output Log in the editor.
- “Command [Args]” – Executes a console command, which might expect arguments
- “CVar” – Prints out the current value of a CVar
- “CVar NewValue” – Sets the value of a CVar to NewValue
- “Command?” – Prints out help on the specified command or CVar
- “Help” – Saves a .html file with all CVars and most console commands
Console Variables (CVars)
Add console variables to tweak existing functionality at runtime or to control debug visualizations. There are a number of ways to define a console variable (check out IConsoleManager.h), but an important gotcha is that only float, int32, and FString types are supported (use an int32 in places you’d normally use a bool or an enum). A typical usage is going to be something like this:
#include "HAL/IConsoleManager.h"

int32 GSomeCoolDebugValue = -1;
static FAutoConsoleVariableRef CVarSomeCoolDebugValue(
	TEXT("MyGame.SomeCoolDebugValue"),
	GSomeCoolDebugValue,
	TEXT("This cool debug value controls how the foos are displayed\n")
	TEXT("  -1: Don't show any foos (default)\n")
	TEXT("   0: Show only the nearest foos\n")
	TEXT("   1: Show mid-range foos\n")
	TEXT(" >=2: Show all foos, even hidden ones"));

…

if (GSomeCoolDebugValue >= 0)
{
	// Show some set of foos based on GSomeCoolDebugValue
}
Console commands
Console commands let you execute code rather than change a variable value:
#include "HAL/IConsoleManager.h"

static FAutoConsoleCommandWithWorldAndArgs GMyCoolCommand(
	TEXT("MyGame.MyCoolCommand"),
	TEXT("Does cool things (this is the help text for the command)"),
	FConsoleCommandWithWorldAndArgsDelegate::CreateLambda([](const TArray<FString>& Args, UWorld* World)
	{
		UE_LOG(LogTemp, Log, TEXT("My cool command was passed %d args"), Args.Num());
	})
);
The example above gets a pointer to the current world but not a lot else to go on. In order to get closer to some game framework classes you can tag reflected member functions with the Exec specifier in the UFUNCTION() declaration (or by checking the Exec box in the BP editor). You can use this markup on functions in any class, but by default console commands are only ‘routed’ to a few kinds of classes (see this wiki page for more info). The three most interesting places where Exec functions work are pawns, player controllers, and the cheat manager.
Here’s an example that could be triggered by typing, e.g., “GiveHealth 25” when controlling a hypothetical APawnWithHealth instance:
// Heal the pawn for the specified amount
UFUNCTION(Exec)
void GiveHealth(float AmountToGive)
{
	Health = FMath::Clamp(Health + AmountToGive, 0.0f, MaxHealth);
}
Note that you can use parameters here and they’ll be automatically parsed for you, unlike FAutoConsoleCommandWithWorldAndArgs where you have to parse them yourself. If a parameter is missing then the default value for the type will be passed in.
Leaving code like this around in your shipping game is not always desirable, especially if it’s a multiplayer game where the client shouldn’t even be handling these sorts of things. Using a cheat manager subclass is a good way to concentrate sensitive debugging commands in one place which will be automatically disabled in Shipping builds. You can specify your custom cheat manager subclass in the CheatClass property of your player controller.
Remember how I mentioned that Exec functions are only callable from some classes by default? That’s not entirely true, you can still call functions on arbitrary classes using a special command: “ke ActorName EventName” will trigger the exec command on the specified actor (you can use * to broadcast to all actors that implement the named event). Similarly, any exec functions in a Level Script Blueprint can be called by using “ce EventName” (ce is short for cinematic event, and this is typically used to skip to specific scenes in a matinee or sequencer cinematic for ease of testing).
Random aside: abtest command
There is an amazingly useful console command called abtest which randomly switches back and forth between two values for a console variable or two console commands.
// Set CVar to value1 or value2 randomly every so often
abtest CVar value1 value2

// Calls Command1 or Command2 with optional arguments randomly every so often
abtest "Command1 Args1" "Command2 Args2 Args3"

// Stops whatever abtest has been running
abtest stop
This is useful when testing out the cosmetic impact of different settings, but it was really designed for performance testing. abtest spits out an estimate of potential time savings and a confidence in that estimate which updates every so often (trust the ‘gut reaction’, usually a real win will show up strongly and consistently very quickly, don’t go fishing for a lucky run that supports your bias). An important caveat is to make sure the code under test is on the critical path or the results will be meaningless noise due to the pipelined nature of the engine. There are other ways to do a/b testing in those cases, have a look at the code.
Stay tuned
Part 2 will likely cover the basics of creating a custom asset type, some approaches to data validation, and simple ways to customize the details panel or react to modifications.